
What damage does a rogue DHCP server cause?
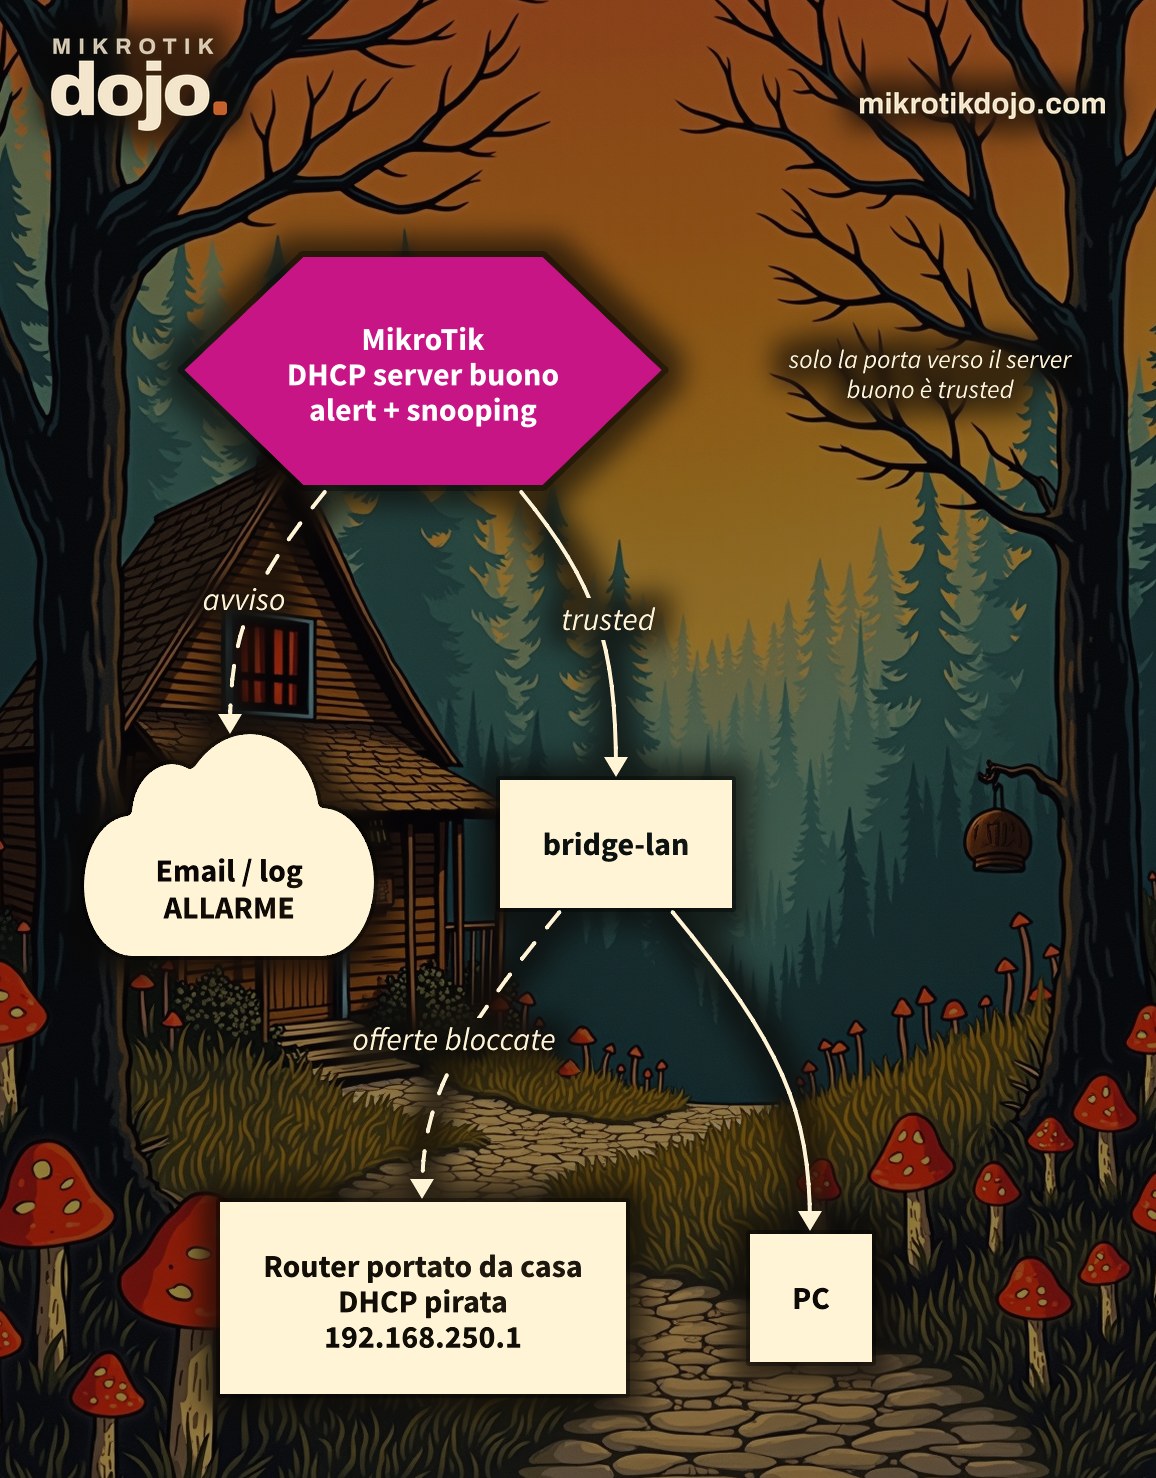
Clients accept the first offer they receive. If there is a second server on the network, some devices will get the wrong IP address, gateway, and DNS: no internet, unreachable printers, and a “spotty” failure that drives anyone trying to troubleshoot it crazy. The culprit is usually a home router connected backwards by someone with the best of intentions. In the worst case, it is placed there on purpose to hijack traffic.
I have seen this happen in the lab: with a second server on the same LAN, the test PC got 192.168.250.198 with the rogue server’s gateway, instead of its usual 192.168.88.199. No error, no warning: simply, that PC was no longer on the correct network.
MikroTik gives you two tools: the alert, which notifies you, and DHCP snooping, which blocks it.
Step 1: Which is the legitimate DHCP server?
Before hunting for the rogue one, know the legitimate one. If the DHCP server is the router itself, you can see it here:
/ip dhcp-server printThe router’s server never triggers the alert: you do not need to declare it. If the legitimate server is another machine (a Windows Server, another router), you need its MAC address to specify it as a valid server in Step 2.
In the examples, the LAN ports are in bridge bridge-lan: replace the name with yours.
Step 2: How do I get notified by MikroTik?
Using the DHCP server alert: you specify the interface to monitor and, if applicable, the MAC of the legitimate server that is not the router. Any other server responding triggers the warning.
/ip dhcp-server alert add interface=bridge-lan valid-server=00:0C:42:8D:D1:30 \
    alert-timeout=1h on-alert=":log warning \"DHCP server non autorizzato su bridge-lan\""
/ip dhcp-server alert enable [find interface=bridge-lan]
⚠️ Warning: alerts are disabled by default. Without the second line, the alert remains there, with its X in front, and does not notify anyone. This is the most common mistake: I have made it too.
interface: if the LAN ports are in a bridge, you monitor the bridge, not the single Ethernet port;valid-server: the MAC of the legitimate DHCP server, only if it is not the router itself. If the server is the router, you can omit it;alert-timeout: how long it takes for the router to “forget” a rogue server already found; if it is still there, a new warning is triggered.
To not miss replies sent directly to clients, the alert also acts as a DHCP client: about once a minute it sends its own request and listens for who responds. For this reason, it should not be placed on an interface where the router itself gets its address via DHCP, for example the WAN towards the modem. The details are in the MikroTik manual: DHCP Alerts.
When the rogue server shows up, this appears in the log (real lab output):
dhcp,critical,error dhcp alert on bridge-lan: discovered unknown dhcp server, mac 50:00:00:1A:00:01, ip 192.168.250.1
script,warning DHCP server non autorizzato su bridge-lan
The MAC and IP of the rogue server remain visible here as well:
/ip dhcp-server alert print detailThe MAC is the best clue to find the culprit: look for it in the bridge’s host table (/interface bridge host print where mac-address=…) to know which port it is connected to.
Step 3: How do I receive the warning via email?
By sending an email in on-alert. However, the router must first be able to send emails: there is a dedicated how-to on sending emails from MikroTik using Gmail.
/ip dhcp-server alert set [find interface=bridge-lan] on-alert={
    :log warning "DHCP server non autorizzato su bridge-lan"
    /tool e-mail send to="admin@example.com" subject="ALLARME: DHCP server non autorizzato" \
        body=("Rilevato un DHCP server non autorizzato sulla LAN di " . [/system identity get name] . ". Vedi /ip dhcp-server alert.")
}
The router name (/system identity) in the email is valuable when managing dozens of clients: you immediately know which network the alert came from.
To test again without waiting for the alert-timeout, make the router forget the servers it has already found:
/ip dhcp-server alert reset-alert [find interface=bridge-lan]If the email does not go out, the error ends up in the log with the topic e-mail, while the :log warning line remains anyway.
Step 4: how do I block the rogue server?
Using the bridge’s DHCP snooping. You enable it on the bridge and declare only the ports from which a legitimate server can arrive as “trusted” (trusted): DHCP replies entering from other ports are discarded.
/interface bridge set [find name=bridge-lan] dhcp-snooping=yes
/interface bridge port set [find interface=ether1] trusted=yes
The second line is only needed if the legitimate server is behind a bridge port, here ether1. If the DHCP server is the router itself, no trusted port is needed: the router does not pass through a bridge port.
In the lab, with snooping enabled and the rogue device connected to an untrusted port, the PC immediately reverted to its 192.168.88.199 and the alert stayed silent: the rogue offers are discarded at the port before reaching the router.
⚠️ Warning: snooping stops the rogue device only if it is connected to a different port than the clients. If the rogue device and the PCs are on the same “dumb” switch connected to a single MikroTik port, they talk directly within the switch and the MikroTik cannot do anything about it. This is why it is advisable to enable snooping on the access switches.
Check which ports you have declared as trusted:
/interface bridge port print where trusted=yesStep 5: what about Option 82?
With snooping enabled, the bridge can add the Option 82 to client requests: a label that tells the DHCP server from which switch and which port the client is coming from. In an operator network or an apartment building, this means you can assign the address based on the port, not the device.
From RouterOS 7.23 onwards, it is configured like this (the old option add-dhcp-option82=yes no longer exists: on RouterOS 7.24.5 it returns bad parameter):
/interface bridge set [find name=bridge-lan] dhcp-agent-circuit-id="\$(INTERFACE)" \
    dhcp-agent-remote-id="\$(HOSTNAME)"
$(INTERFACE) becomes the client port name, $(HOSTNAME) the router name; there are also $(VID) and $(BRIDGEMAC). The \ before the dollar sign is needed in the terminal, otherwise RouterOS interprets it as its own variable. If your DHCP server does not use Option 82, you can skip this step. A complete example with two switches and all variables is in the MikroTik manual: DHCP Snooping and DHCP Option 82.
Step 6: does it work on switches too?
Yes, and on switches it is even more effective, because it blocks the rogue device at the port it is connected to, before the traffic reaches the router. According to MikroTik documentation, on switches with Marvell Prestera chips (such as the CRS3xx and CRS5xx series), DHCP snooping and Option 82 are handled entirely in hardware. On other devices, they also work with hardware offload enabled, but only if there is no VLAN configuration on the bridge.
Step 7: what do I check before putting it into production?
Alerts and snooping protect the LAN, not the router. If you have not done it yet, follow the Basic Hardening of a MikroTik router: a user different from admin, limited services, firewall towards the internet.
Tested in the lab on PNETLab with CHR RouterOS 7.24.5 (stable), a Linux client, and a second router acting as a rogue DHCP server: alert disabled and enabled, email notification, DHCP snooping, and the new Option 82 syntax. Behavior on physical switches is based on MikroTik documentation.
Frequently asked questions
How do I detect an unauthorized DHCP server with MikroTik?
Using /ip dhcp-server alert: specify the interface to monitor, enable the alert (it is disabled by default), and when an unknown server responds, RouterOS writes to the log and triggers the on-alert script.
Why is my DHCP alert not triggering?
Almost always because it is disabled: alerts are created with X and must be enabled with /ip dhcp-server alert enable. The router’s own DHCP server, however, never triggers the alert.
Which interface should the DHCP alert be placed on?
On the interface representing the LAN: if the ports are in a bridge, place it on the bridge, not on the individual Ethernet port. Do not place it on an interface where the router obtains its address via DHCP.
What is the difference between the alert and DHCP snooping?
The alert signals that there is an unauthorized DHCP server but does not stop it; bridge DHCP snooping drops DHCP responses arriving from untrusted ports, so the rogue server cannot assign addresses.
Which ports should be marked as trusted?
Only those from which the legitimate DHCP server may arrive, for example the port facing the server or the distribution switch. Ports facing users remain untrusted. If the server is the router itself, none.
add-dhcp-option82 no longer works, why?
Since RouterOS 7.23, the option has been removed: Option 82 is configured with dhcp-agent-circuit-id and dhcp-agent-remote-id on the bridge, using variables such as $(INTERFACE) and $(HOSTNAME).
This how-to updates a 2016 article from my old blog wirelessguru.it, now offline, to RouterOS 7.