
What do we get?
From any Wi-Fi or mobile network, your phone joins your home or office network as if it were physically there: open the camera page, the NAS, or WinBox on the router, and everything travels encrypted. With WireGuard and RouterOS 7, the router does most of the work: it ends by showing you a QR code, you scan it with the WireGuard app, and you are done.
This is the “road warrior” scenario: a user traveling around the world connecting to the base. It takes only a few minutes, but first, one thing is required: the router must be reachable from the internet.
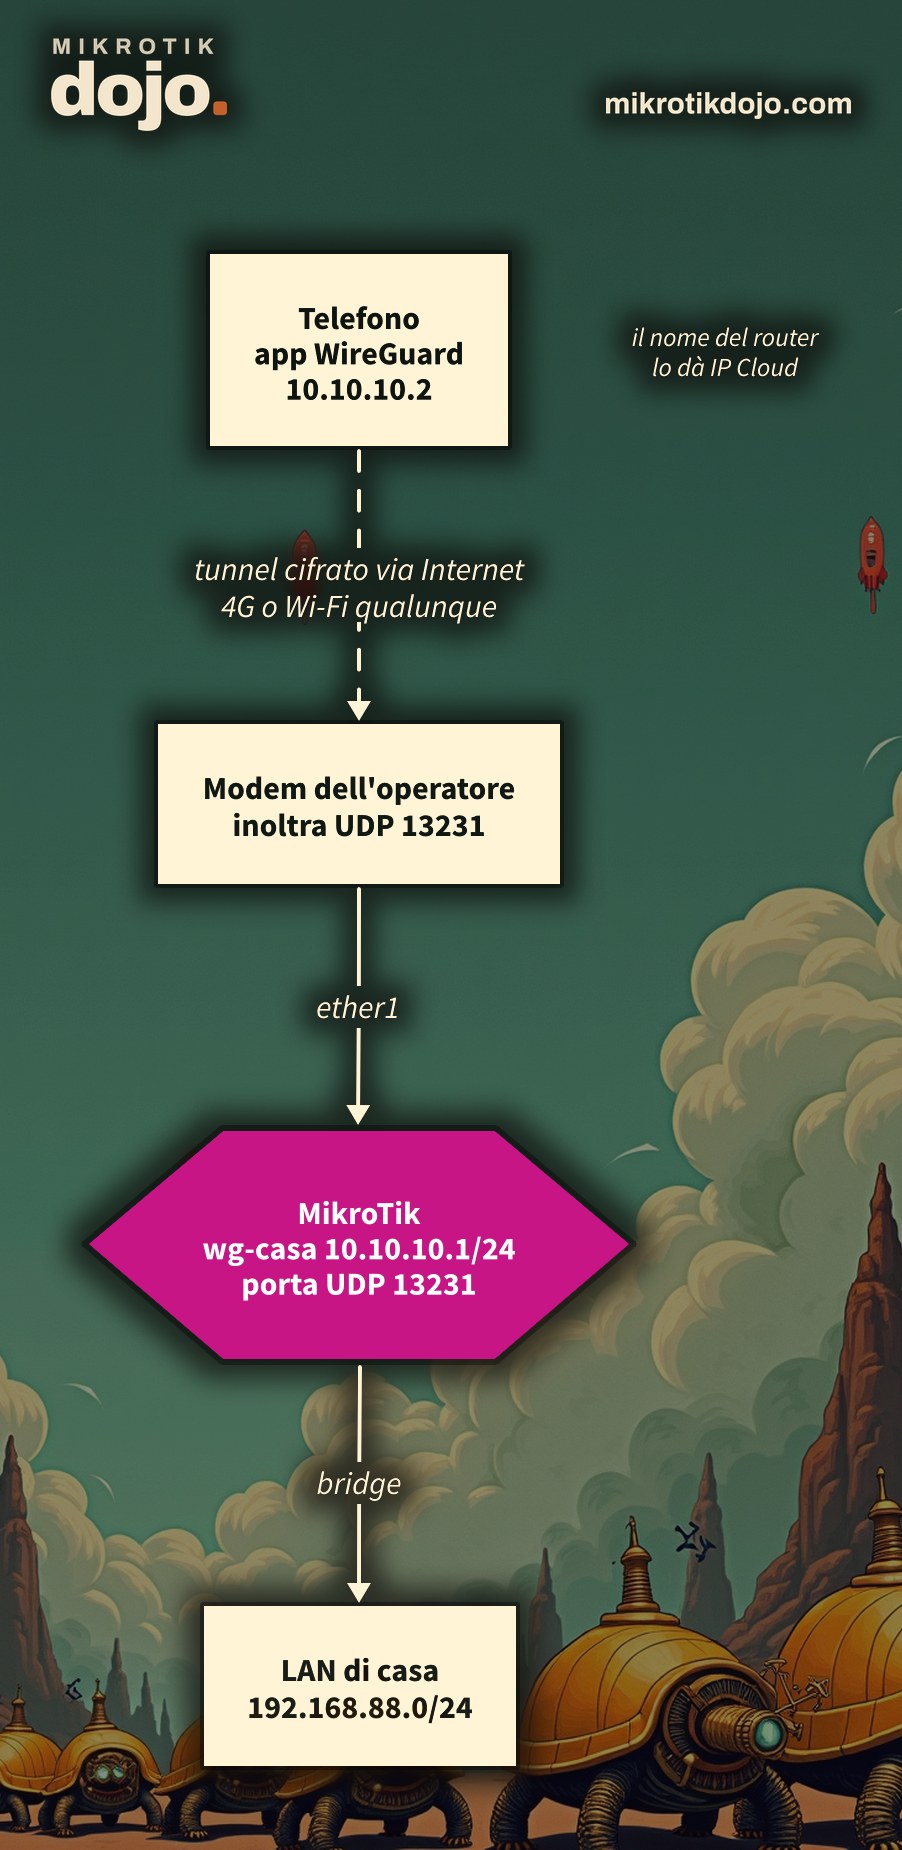
Step 1: Is the router reachable?
The phone needs to know where to knock. Two cases:
- the line has a fixed public IP address: use that;
- the IP address changes: enable IP Cloud and use the fixed name it provides, as explained in the MikroTik IP Cloud how-to. In the examples, it is
hx12345abcd.sn.mynetname.net.
⚠️ Warning: if the ISP modem is in front of the MikroTik, you must forward UDP port 13231 on the modem to the MikroTik. Without that forwarding, the phone knocks on the modem, and the modem does not open.
Step 2: How do I create the WireGuard interface?
/interface wireguard add name=wg-casa listen-port=13231
/ip address add address=10.10.10.1/24 interface=wg-casa comment="VPN telefoni"
The VPN network, 10.10.10.0/24, must be different from all networks you already use, including the LAN. Check it with the Dojo IP calculator. The router generates its key pair automatically.
Step 3: How do I open the firewall?
Two rules: one lets the VPN in from the internet, the other treats traffic coming from the VPN as if it were on the LAN.
/ip firewall filter add chain=input protocol=udp dst-port=13231 in-interface-list=WAN action=accept \
    comment="WireGuard telefoni" place-before=0
/interface list member add list=LAN interface=wg-casa
With wg-casa in the LAN list, the connected phone can use the router’s DNS and reach WinBox, exactly like a PC on the network. If your firewall is the one from Basic Hardening of a MikroTik Router, the WAN and LAN lists are already there.
Step 4: How do I add the phone?
One peer per phone. The trick that saves time: private-key=auto makes the router generate the phone’s key as well, so the configuration is already complete.
/interface wireguard peers add interface=wg-casa name=telefono-gianni private-key=auto \
    allowed-address=10.10.10.2/32 client-address=10.10.10.2/32 client-dns=10.10.10.1 \
client-endpoint=hx12345abcd.sn.mynetname.net responder=yesallowed-addressandclient-address: the phone’s address inside the VPN; each phone has a different one (.2,.3…);client-dns: the phone will use the router as DNS, so it can also resolve names on the home network;client-endpoint: the name or address from Step 1, which the phone connects to;responder=yes: the router waits for the phone to call, without trying to find it itself.
Step 5: How do I get the configuration onto the phone?
The router prepares it automatically, based on the client-* fields of the peer:
/interface wireguard peers show-client-config [find name=telefono-gianni]The command shows the configuration text and the QR code to scan; you can do the same from WinBox by opening the phone’s peer in WireGuard → Peers. The text looks like this (the real one from my lab, without the keys):
[Interface]
ListenPort = 51820
PrivateKey = (la chiave del telefono)
Address = 10.10.10.2/32
DNS = 10.10.10.1
[Peer]
PublicKey = (la chiave del router)
AllowedIPs = 0.0.0.0/0, ::/0
Endpoint = hx12345abcd.sn.mynetname.net:13231
On the phone, install the official WireGuard app, tap +, choose creation from QR code, and scan the code. Give the tunnel a name, turn it on, and you are done.
⚠️ Warning: that QR code contains the phone’s private key. Do not send it via chat and do not leave it in a photo: whoever has it can access your network. Display it on the screen, have it scanned, and close it.
Step 6: how do I verify it works?
With the tunnel active, check the peer on the router:
/interface wireguard peers print where name=telefono-giannilast-handshake must be from a few seconds or minutes ago, and rx and tx must be increasing. In the lab, I connected a Linux PC “from outside” using the configuration generated by the router: ping to the router (10.10.10.1) and to a PC on the LAN, web pages opened through the tunnel, and names resolved by the router’s DNS. Everything worked on the first try.
Step 7: what if I only want traffic towards home in the tunnel?
By default, the configuration sends all phone traffic into the tunnel (AllowedIPs = 0.0.0.0/0, ::/0): even web browsing exits from home. This is what you want on an untrusted public Wi-Fi. If you only want traffic towards the home network in the tunnel, specify the networks in the peer:
/interface wireguard peers set [find name=telefono-gianni] \
    client-allowed-address=192.168.88.0/24,10.10.10.0/24
Regenerate the QR code and have it scanned again: now AllowedIPs contains only those networks. This parameter has been available since RouterOS 7.21; all details are in the MikroTik manual: WireGuard.
What do I check before putting it into production?
- one peer per person and per device: if a phone is lost, you delete its peer and the others continue to work;
- the router stores the phones’ private keys generated with
private-key=auto. The export hides them, but anyone who accesses the router can see them: protect it with the Basic Hardening of a MikroTik router; - port 13231 is the only thing open to the internet: WinBox and SSH remain closed and you reach them through the tunnel.
Tested in the lab on PNETLab with CHR RouterOS 7.24.5 (stable) and a Debian 12 client behind another router, using the configuration generated by show-client-config: handshake, ping to the router and the LAN, browsing and DNS through the tunnel, split tunnel with client-allowed-address, private key hidden in the export. Scanning the QR code with the phone’s WireGuard app was not tested in the lab.
Frequently asked questions
How do I connect the phone to the MikroTik with WireGuard?
Create a WireGuard interface and a peer with private-key=auto and the client-* fields, then generate the configuration with /interface wireguard peers show-client-config and scan the QR code with the WireGuard app.
Does it work if the router has a dynamic address?
Yes: with IP Cloud the router has a fixed name (numero-di-serie.sn.mynetname.net) that follows the address; you use that name as client-endpoint.
Why doesn’t the phone connect?
The most common causes: UDP port 13231 is not accepted in the input firewall, or the modem in front of the MikroTik does not forward it. On the router, in the peer, an empty last-handshake means the packets are not arriving.
How do I pass only traffic towards home in the tunnel?
Using client-allowed-address in the peer (since RouterOS 7.21), specifying the home and VPN networks; then regenerate the QR code.
Is the QR code sensitive data?
Yes: it contains the device’s private key. Whoever has it can connect to the network, so it must only be displayed on the screen and never sent or photographed.